Making homemade yogurt seems like a fool’s errand when you can buy a cheap tub from the grocery store. It sounds like a bit much, even for those who make everything from scratch.
But all those plastic yogurt tubs add up. Even if you recycle, they’re getting shunted back and forth in the waste stream. Plus, if you’re buying organic yogurt that doesn’t have the usual stuff like added stabilizers and thickeners, you are definitely not buying a cheap tub of yogurt. If you make your own, you can eat organic yogurt for significantly less, reduce your waste output, and know exactly what’s in your food. It’s a hippie-weirdo dream!
You don’t need any fancy equipment to make yogurt, and I’ll walk you through the cheapskate way of doing it.
However, if you want an excuse to buy something, buy an Instant Pot. It’s frickin’ magic, and your yogurt will practically make itself. As Laura Pazzaglia explains in this video:
Okay, now for the cheap-o way. You will need:
- Milk: whole works best, and ultra-pasteurized doesn’t work well
- Powdered milk if using low-fat milk
- Plain yogurt, a little over 1 Tbsp
- 2 pots that can act as a double boiler
- Candy thermometer
- Glass jars or bowl sterilized via dishwasher or boiling method
- Some kind of insulating contraption
- Time (It’s best to start late morning so your yogurt can incubate through the day and be chilled overnight.)
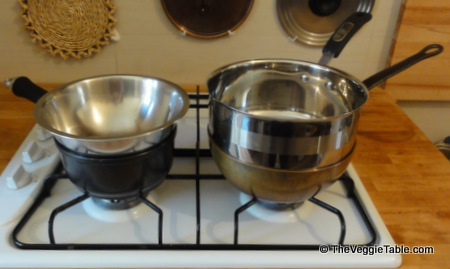
First, make a double boiler by filling a somewhat larger pot with a couple inches of water and set a smaller pot in it. The smaller pot should be able to hold around 1.5 quarts and fit snuggly over the other. The smaller pot shouldn’t touch the water, but will be heated by steam from the boiling water below.

Pour your milk into the smaller pot and heat it until it reaches 180° F (checking with the candy thermometer) and sustain it at that temperature for a few minutes. When milk hits this temperature, its proteins alter in such a way as to make thicker yogurt. The evaporation of the water in the milk also contributes to a thicker product.
Frankly, this is the hardest part. If you don’t use a double boiler you’ll get burnt-ass milk at the bottom of your pan. If you don’t stir frequently you’ll get gross-ass milk skin. If you don’t heat the milk slowly you’ll get gritty-ass yogurt. Take your time, pay attention, and once it’s heated, the rest is a breeze.
Let’s say you successfully heat your milk. Hooray! If you’re using low-fat milk, whisk in ½ cup of powdered milk so your yogurt isn’t too runny.
Now you wait for it to cool down so you don’t kill the yogurt culture you’ll be adding. You can use the candy thermometer to check when the milk has cooled to 110° F, or just see if you can comfortably hold the pot. It’ll take about 30 min, so go do something else for a bit.

Once the milk is warm but not hot, stir in a your plain yogurt, whatever brand you like that is only cream, milk, and live cultures will do. Additives like thickeners, sugar, flavoring, etc. will affect how your yogurt develops.
You can also use fancy powdered yogurt starters, but they’re more expensive and if you’re doing all this, shouldn’t it be cheap?
After adding your starter, close up your jars and put it in whatever insulating contraption you have on hand. I’ve found that a sleeping bag works beautifully for this, but you can also wrap your jars in towels and put them in a big pot, if you have Styrofoam lying around that would work well too, potentially a slow cooker, an insulated lunchbox, etc. The point is that you will leave your yogurt to set somewhere for 7-8 hours in something that will keep it around 115° F the whole time.
Then leave it alone. Seriously. Don’t check it or poke at it or shake it. You will have sad, runny, yogurt if you do so.
The longer your yogurt incubates the firmer and more acidic it will be. At the end of the incubation period, pop your yogurt in the fridge over night and it will thicken up some more. When you want to make more yogurt, use the yogurt you already have to start the next batch.
It sounds like a lot of work, but all you’re doing is heating milk, adding stuff after it cools, and then leaving it alone in a sleeping bag/lunchbox/towel for a few hours. Over time, you’ll be able to adjust how long you incubate the yogurt and how much starter to use so not only will your yogurt be cheaper than usual, it’ll be exactly how you like it.


